Land Rover Defender: Seat temperature
Note: Depending on the specification of the vehicle, the seats may have heated and cooled functionality.
Note: Seat heaters consume a large amount of battery power and only operate when the engine is running.
The seat temperature can be adjusted in the following manner:
- Front row seats can be adjusted via the touchscreen and the front rotary controls.
- Second row seats can be adjusted via the touchscreen and the rear rotary controls.
- Third row seats can be adjusted via the heated seat buttons.
Seat temperature adjustment via the touchscreen

To access the seat screen, select SEATS from the Apps screen.
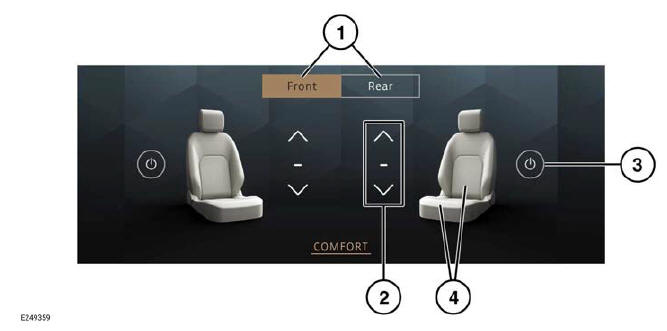
To adjust the seat temperature via the touchscreen:
- Front or rear seat selection: Touch to select front or rear seats.
- Temperature adjustment arrows: Touch to increase or decrease the temperature.
- Power icon: Touch to switch the seat heating and cooling on or off.
- Seat zone selection: Touch to select the required seat zone position for heating and cooling.
Seat temperature adjustment via the rotary controls

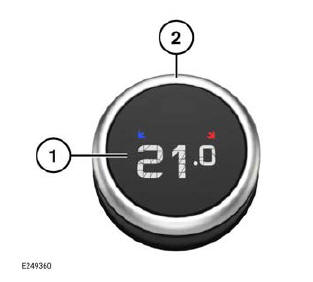
To adjust the seat temperature via the rotary controls:
- Press to switch between cabin temperature control and seat temperature control.
- Rotate to increase or decrease the seat temperature.
Third row seats
 Heated seat icon.
The third row heated seats are operated by the buttons located in the side trim panels.
To operate the third row heated seats:
- Touch the relevant heated seat button to switch the heated seat on at the maximum setting. The three LED indicators in the button illuminate.
- Touch a second time to set the heated seat at the medium setting. Two LED indicators illuminate.
- Touch a third time to set the heated front seat at the lowest setting. One LED indicator illuminates.
- Touch a fourth time to switch off.
TEMPERATURE DIFFERENTIATION
The temperatures selected via the climate control system are perceived values. The system operates to achieve these selected values. The selected value does not represent the output temperature from the air vents. Air vent output temperature varies as the system automatically adjusts the vent outputs to achieve the set temperatures.
The actual temperature in the cabin may differ from the set temperatures due to internal and external factors, including ambient temperature, sun load, and direction. The climate control system automatically adjusts the airflow level, direction, and temperature to compensate for these internal and external factors.
Automatic adjustments in the air vent outputs may result in some temperature differentiation within the cabin.

