Land Rover Defender: Exterior lights overview
The lighting system operates automatically depending upon the ambient lighting conditions. The system selects the appropriate lighting function, low beam or Daytime Running Light (DRL), for the conditions that the system detects. In some circumstances, it may be necessary for the vehicle user to manually override the automatic operation. Some manual operations are not possible due to vehicle activity or legislative requirements.
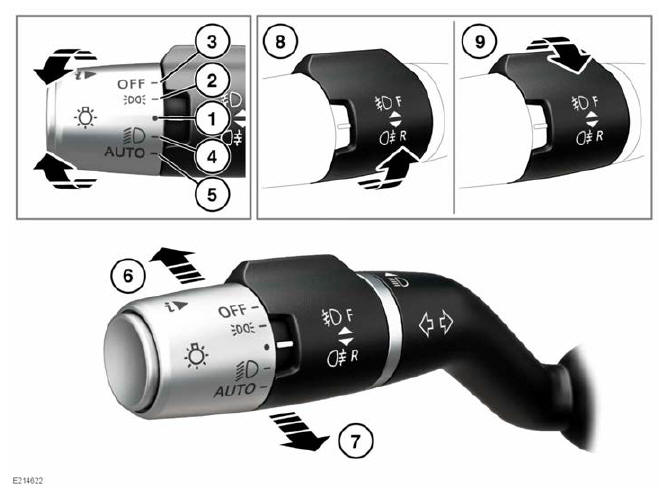
LIGHTING CONTROL

- Neutral position: The lighting system operates automatically, dependent on the ambient level of light. During daylight, the Daytime Running Lights (DRL) automatically switch on. During low ambient light, the headlights switch on automatically. To manually switch on any lighting functions, rotate the lighting control to the required position and release. After being released, the lighting control returns to the neutral position.
- Side lights: Rotate the lighting control to this position to switch the side lights on. The instrument panel warning lamp illuminates.
- Headlights OFF: Rotate the lighting control to this position to switch the headlights off.
- Headlights: Rotate the lighting control to this position to switch the headlights on.
- AUTO: Rotate the lighting control to this position to select AUTO lights.
When ambient light fades and the ignition is switched on, the side lights, rear lights, dipped beam headlights, and license plate lights switch on automatically. Headlight courtesy delay, Auto High Beam Assist (AHBA) and wiper detection may also be activated.
Note: Low ambient light levels, caused by adverse weather conditions, may also cause the auto lights to activate.
- High beam: With the headlights on, push and release the lighting control to select high beam. The instrument panel warning lamp illuminates. Push and release the lighting control again to deselect high beam.
Note: Do not use high beam where it may distract other road users.
- High beam flash: Pull the lighting control toward the steering wheel and release to flash the high beam on and off. High beam remains on for as long as the lighting control is held.
- Front fog lights: Turn the lighting control away from the steering wheel, and release to switch on the front fog lights. The instrument panel warning light illuminates. Turn the lighting control away from the steering wheel again, and release to switch off the front fog lights.
- Rear fog lights: Operate only while the headlights or front fog lights are selected. Turn the lighting control toward the steering wheel, and release to switch on the rear fog lights. The instrument panel warning lamp illuminates. Turn the lighting control toward the steering wheel again, and release to switch off the rear fog lights.
DAYTIME RUNNING LIGHTS (DRL)
Note: The Daytime Running Lights (DRL) option is dependent on the vehicle's specification.
During normal daylight operation, the DRL operate automatically, with the lighting control in the AUTO or neutral position.
The DRL switch on automatically under the following conditions:
- The engine is running.
- The gear selector is out of Park (P).
- The Electric Parking Brake (EPB) is not applied. Market dependent.
- Auto lights are selected and high ambient light levels are detected.
Turn the lighting control to the OFF position to switch off the DRL. The DRL can be manually switched off only when the vehicle is stationary and the engine is running.
HEADLIGHT COURTESY DELAY
Headlight courtesy delay operates whenever the lighting control is in the AUTO position, ambient light levels are low, and the vehicle's ignition is switched off.
The time delay for illumination can be changed via the Exterior Lights settings.
To access the time options for headlight courtesy delay via the touchscreen:
1. Touch the settings icon¹ from any screen.
2. Touch the ALL soft key.
3. Touch the Vehicle soft key.
4. Touch the Exterior Lights soft key.
5. Touch the forward arrow in the box below Home lights to open the options menu.
6. Choose a time delay option.
7. Touch the exit icon² to return to the previously displayed screen.
Press the headlight button on the smart key to switch off courtesy lights at any time.
 Settings icon.¹
 Exit icon.²

