Land Rover Defender: Auxiliary Climate Control
DIAGNOSIS AND TESTING
PRINCIPLES OF OPERATION
For a detailed description of the auxiliary climate control system and operation, refer to the relevant description and operation section of the workshop manual.
Electric Booster Heater (Description and Operation), Fuel Fired Booster Heater (Description and Operation), Auxiliary Climate Control (Description and Operation).
INSPECTION AND VERIFICATION
CAUTION: Diagnosis by substitution from a donor vehicle is NOT acceptable. Substitution of control modules does not guarantee confirmation of a fault and may also cause additional faults in the vehicle being checked and/or the donor vehicle
NOTES:
- If a control module or a component is at fault and the vehicle remains under manufacturer warranty, refer to the Warranty Policy and Procedures manual, or determine if any prior approval program is in operation, prior to the installation of a new module/component.
- Generic scan tools may not read the codes listed, or may read only 5-digit codes. Match the 5 digits from the scan tool to the first 5 digits of the 7-digit code listed to identify the fault (the last 2 digits give extra information read by the Jaguar Land Rover approved diagnostic equipment).
- When performing voltage or resistance tests, always use a digital multimeter that has the resolution ability to view 3 decimal places. For example, on the 2 volts range can measure 1mV or 2 K Ohm range can measure 1 Ohm. When testing resistance always take the resistance of the digital multimeter leads into account.
- Check and rectify basic faults before beginning diagnostic routines involving pinpoint tests.
- Inspect connectors for signs of water ingress, and pins for damage and/or corrosion.
- If Diagnostic Trouble Code(s) (DTC)s are recorded and, after performing the pinpoint tests, a fault is not present, an intermittent concern may be the cause. Always check for loose connections and corroded terminals.
- Verify the customer concern
- Visually inspect for obvious signs of mechanical or electrical damage
Visual Inspection
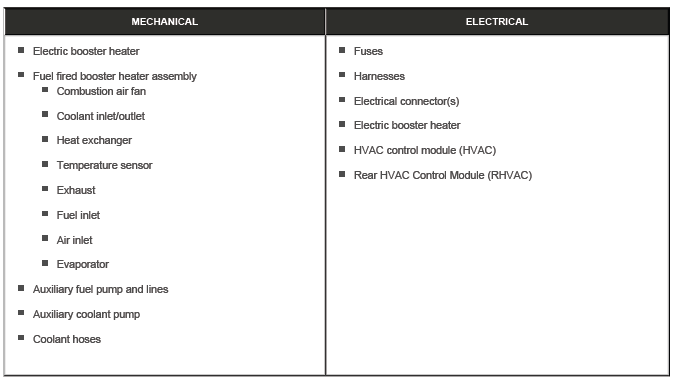
- If an obvious cause for an observed or reported concern is found, correct the cause (if possible) before proceeding to the next step
- If the cause is not visually evident, check for diagnostic trouble codes and refer to the DTC index
- Check Jaguar Land Rover claims submission system for open campaigns. Refer to the corresponding bulletins and SSMs which may be valid for the specific customer complaint and complete the recommendations as required
SYMPTOM CHART
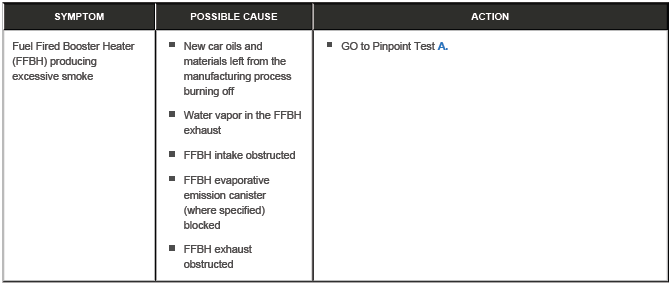


PINPOINT TEST
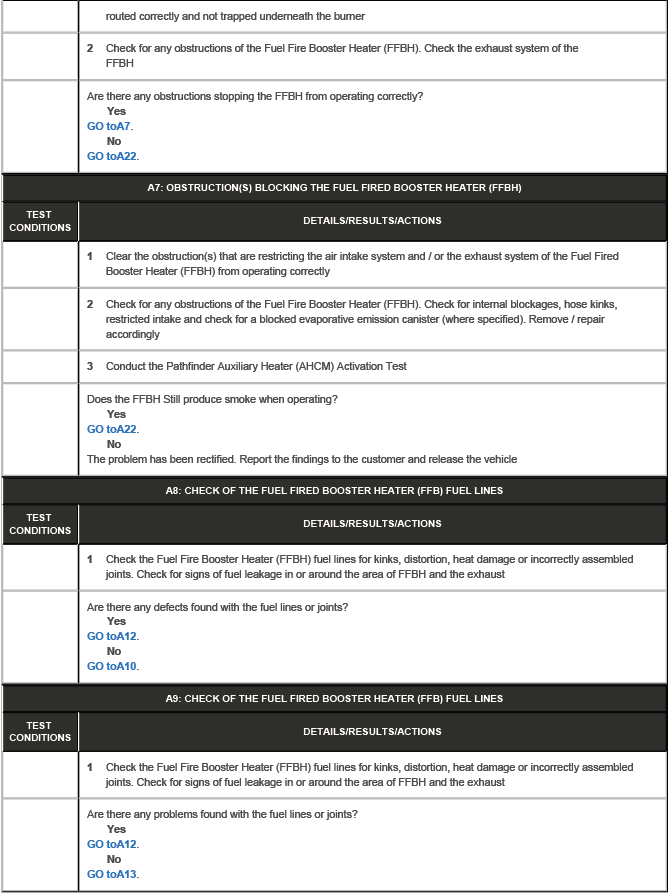
PINPOINT TEST A : FUEL FIRED BOOSTER HEATER (FFBH) PRODUCING EXCESSIVE SMOKE
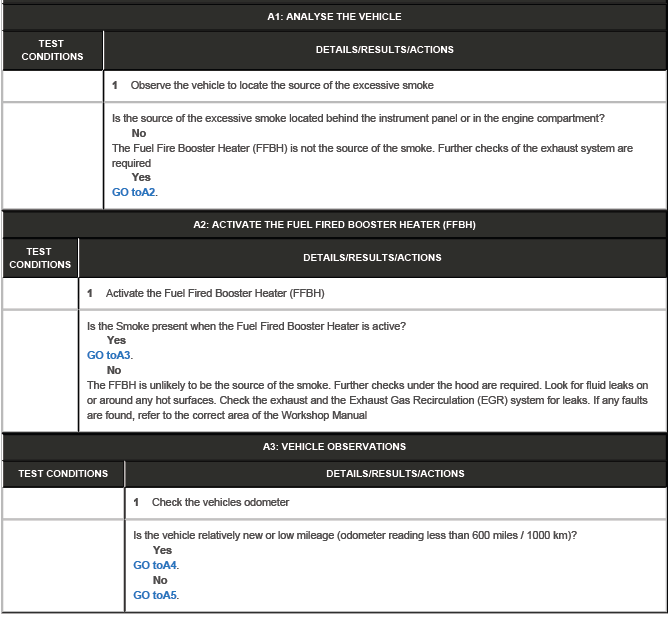
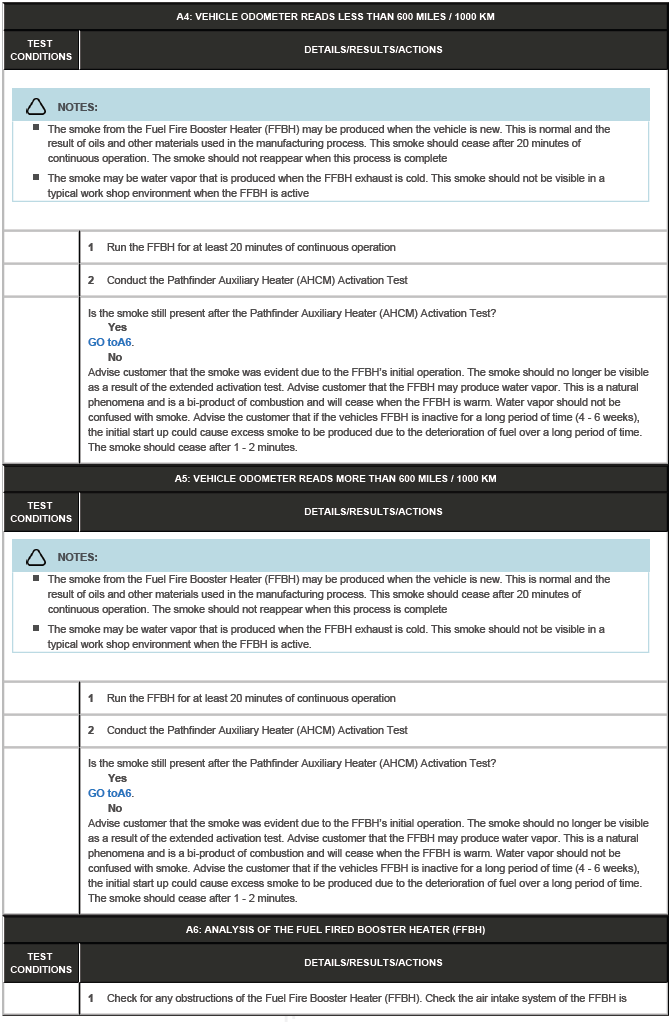


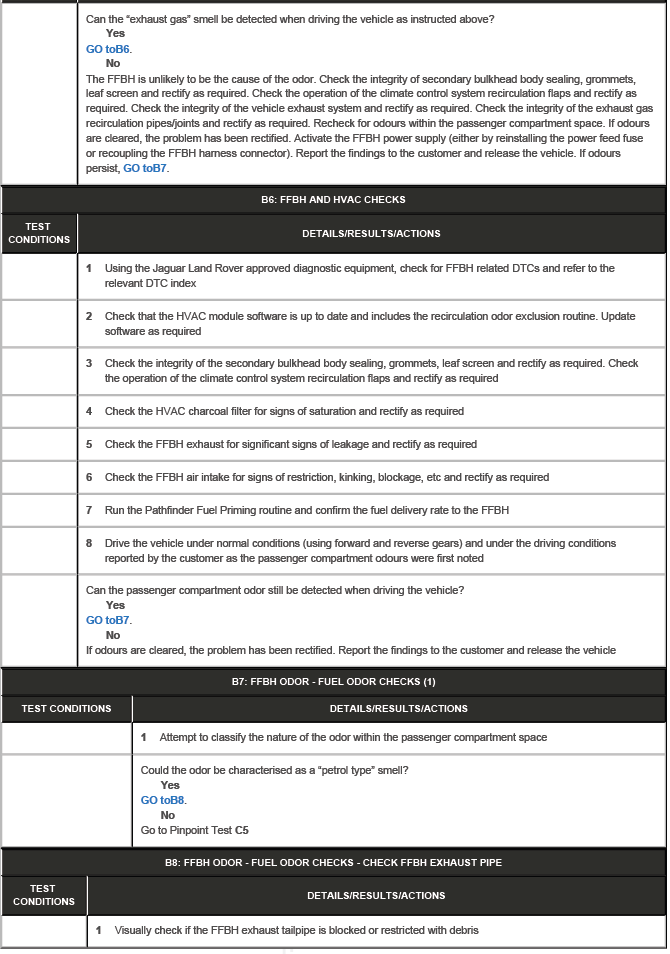
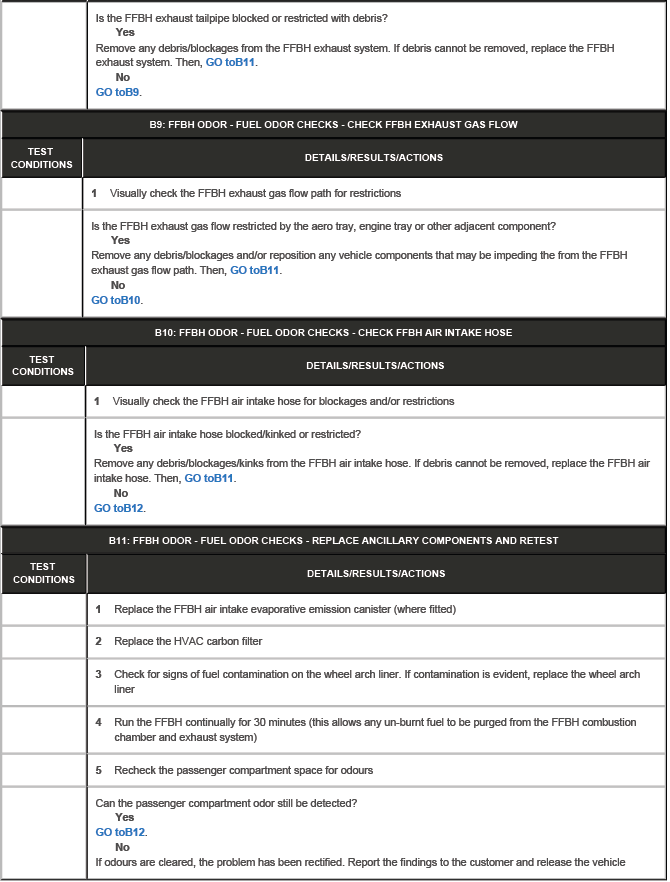
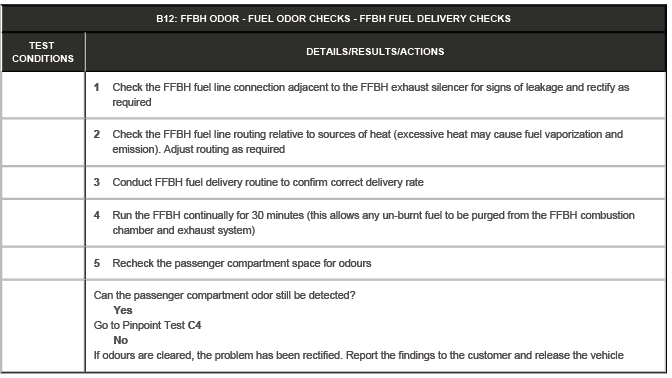
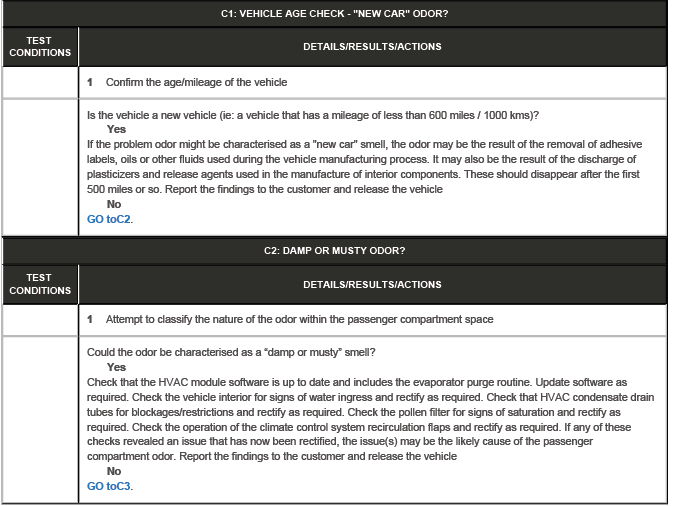
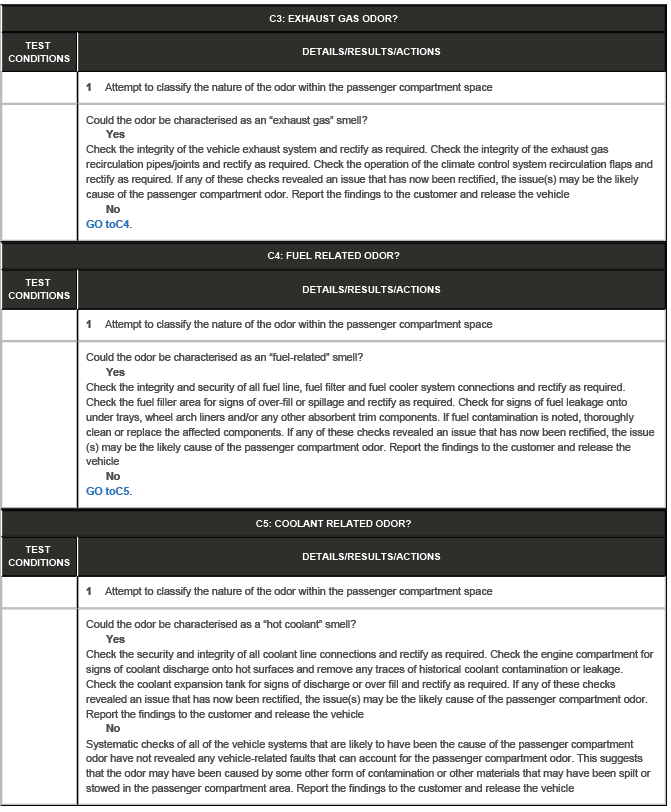
PINPOINT TEST B : CUSTOMER REPORTS OF UNPLEASANT OR EXCESSIVE ODOR IN THE PASSENGER COMPARTMENT


PINPOINT TEST C : UNEXPLAINED PASSENGER COMPARTMENT ODOURS - FURTHER CHECKS IN OTHER VEHICLE SYSTEMS
REAR CLIMATE CONTROL INSUFFICIENT TEMPERATURE
- Complete the coolant system bleeding procedure REFER to: Cooling System Partial Draining and Vacuum Filling and follow the procedure
NOTE: Important points are 30 to 33 when the engine is fully warmed up
- Complete the above procedure 3 times if warm air is not felt from the rear HVAC
- After the 3rd attempt, confirm if the rear HVAC is blowing warm air
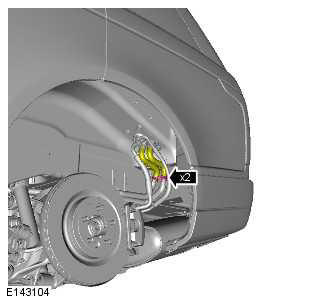
- If no warm air is felt, remove the rear left wheel arch linerREFER to: Rear Wheel Arch Liner. Confirm that the two coolant pipes as shown in the image above are warm. If both coolant pipes are warm proceed to step 11. If one or both pipes are cold proceed to step 5
CAUTION: Pipes could be hot so take adequate precautions
- Attach the Jaguar Land Rover approved chassis ears to the rear HVAC cooling pipes and confirm if fluid can be heard passing around the system

- Refer to image above and confirm if both the coolant pipes at point C increased in temperature up to the upper coolant hoses
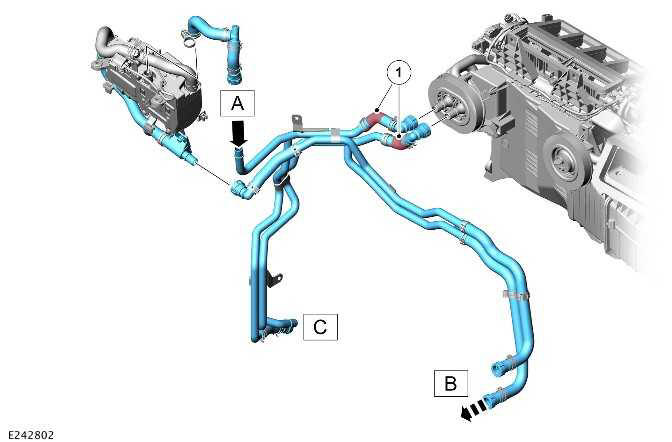
- If after performing the bleed procedure 3 times there is still no warm air coming from the rear HVAC, clamp off both the front heater core hoses at point 1 shown in the image above and re-perform the bleed procedure
- Monitor the coolant level and top up as required. The level could drop up to 2 litres when the rear HVAC system is bled correctly
- If the pipes are now hot, remove the clamps from the front heater core pipes and run the engine for a further 15 minutes checking heat is now coming from both the front and rear HVAC
- Allow the vehicle to cool then perform a road test. Re-check both coolant pipes to the rear heater core are hot and warm air is blowing from the front and rear HVAC
- If after performing the procedure 3 times with the front heater core coolant pipes clamped off, the rear coolant pipes are warm, but the rear HVAC is still blowing cold air, there is an issue with the rear HVAC unit. Using the Jaguar Land Rover approved diagnostic equipment, check the HVAC control module for related DTCs and refer to the relevant DTC index

