Land Rover Defender: Front climate control


Do not adjust the touchscreen controls, or allow the system to distract the driver, while the vehicle is moving.
Driver distraction can lead to accidents, potentially causing serious injury or death.
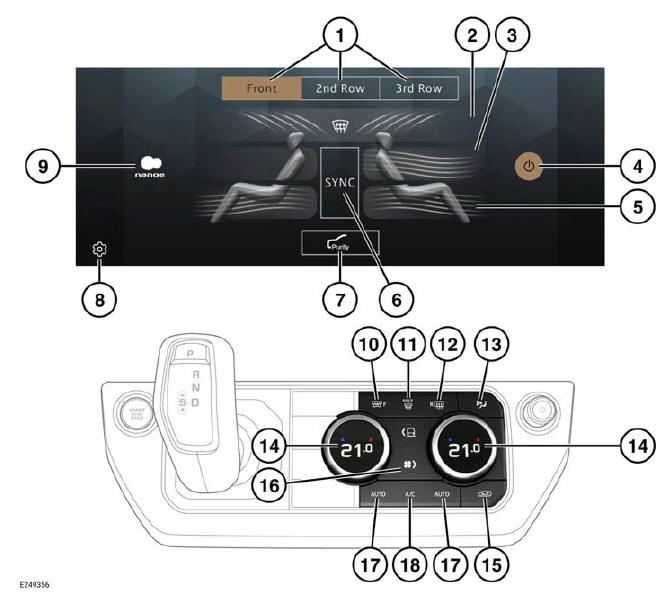
To access the front climate screen, select CLIMATE from the Apps screen.
Alternatively, press the climate button located below the touchscreen (13).
- Touch to select a cabin zone. Cabin zone soft keys vary according to vehicle specification.
- Air distribution to the front windshield icon: Touch to switch on or off.
- Air distribution to the face icon: Touch to switch on or off.
- Power icon: Touch to switch the climate control system on or off.
- Air distribution to the feet icon: Touch to switch on or off.
- Sync soft key: Select to synchronize the front and rear passenger's climate settings to the driver's settings.
- Purify icon: Removes air pollution from the cabin through combined activation of the air ionizer, Air Conditioning (A/C), and timed recirculation. Touch to switch on or off.
- Settings icon: Touch to select the settings screen and then select Climate.
- Air ionization icon: Touch to activate
air ionization. Air ionization can only
be activated when air distribution to
the face mode has been selected.
Selection of AUTO mode deactivates the air ionization mode.
Note: Air ionization technology is designed to improve the air quality within the cabin.
- Heated windshield button: Press to
switch on or off. If left on, the heated
windshield deactivates after a timed
period, dependent on the ambient
temperature.
Note: In cold ambient conditions, the windshield and rear screen heaters switch on automatically when the engine is started. The function can be switched on or off via climate settings.
Note: The heated windshield operates only when the engine is running.
- MAX button: Press to switch maximum defrost for the windshield on or off.
- Heated rear screen button: Press to switch on or off. If left on, the heated rear screen deactivates after a timed period, dependent on the ambient temperature.

Do not attach labels to the rear screen.
Do not scrape or use abrasive materials to clean the inside of the rear screen.
Note: The heated rear screen operates only when the engine is running.
- Climate button: Press to access the front climate screen.
- Rotary controls: Rotate to adjust the cabin or seat temperature. Press to switch between cabin temperature control and front seats temperature control.
- Recirculation button: Press to
recirculate air inside the vehicle.
- Press briefly to select timed recirculation. Recirculation switches off automatically after a set time, dependent on the ambient temperature.
- Press and hold to select latched
recirculation. Recirculation remains
on until the button is pressed
again.
Note: Prolonged use may cause the windows to mist.
- Blower speed control button: Press
to switch blower speed adjustment on
or off. Turn the rotary control to adjust
the blower speed.
Note: The blower speed is automatically set in AUTO mode.
Adjusting the blower speed cancels AUTO mode.
- AUTO mode button: Press to switch
fully automatic mode on. Dependent
on the vehicle's specification, the
various options for AUTO mode can
be set via climate settings.
Note: AUTO mode is the
recommended normal operating
mode. In AUTO mode, the system
regulates cabin climate based on
feedback from the vehicle's sensors,
helping maintain a stable and
comfortable cabin environment.
Note: When a climate setting is adjusted manually the system exits full AUTO mode, this overrides automatic climate adjustment and delivers only the selected settings.
- A/C button: Press to switch the A/C system on or off. The A/C system can be switched on or off independently of the other climate control functions.
Note: Some of the buttons have an LED indicator lamp that illuminates to confirm selection.
Note: If the climate control system is switched off, pressing the AUTO button or the defrost button switches the climate control system on.
Note: Water expelled by the A/C system may collect underneath the vehicle, when parked. The expelled water is not a cause for concern.
The following applies if this vehicle is fitted with an air ionizer.
United States of America, Federal Insecticide, Fungicide, and Rodenticide Act (FIFRA):
This vehicle, which may be fitted with a regulated pesticide device (air ionizer) was produced at the following facility: EPA Est. 93184-SVK-1
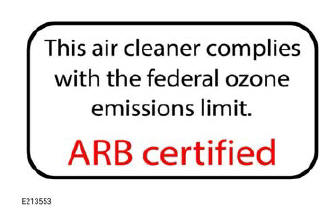
California Air Resources Board (ARB), Air Cleaning Devices Regulation: The following applies to the air ionizer device that may be fitted in this vehicle:

AUTOMATIC RECIRCULATION
The climate control system monitors exterior air pollution, and selects recirculation if it reaches a predetermined level. Automatic recirculation only operates when the Air Purity function is active. The sensitivity of the air quality sensor can be set via the Climate Settings screen.
Note: It is recommended that automatic recirculation is enabled, to maintain the optimum air quality within the vehicle.
CLIMATE SETTINGS
To view the Climate settings menu, touch the settings icon, then select Climate.
- Air purity: The air quality sensor, for automatic recirculation, can be adjusted.
- Auto air flow: The blower speed, for automatic operation, can be set to Soft and Quiet, Balanced, or Powerful and Fast.
- Auto blinds: The auto operation of the roof blind can be enabled or disabled.
- Automatic heated windows: Automatic operation of the heated windshield and the heated rear window can be enabled or disabled.
AIR QUALITY SENSOR
The sensitivity of the air quality sensor can be adjusted by changing the Air Purity level.
To adjust the Air Purity level:
1. 1. Select Climate settings from the settings screen.
2. Select Air Purity and then select the appropriate level: Low, Medium, or High.
To deactivate, touch OFF.

