Land Rover Defender: Phone system overview

Make sure the relevant safety warnings have been read and understood before operating the phone features.
Note: The touchscreen displays the recent call list in the order that the calls were recorded. If this information is not available on the connected phone, the recent call list displays as sent from the phone. Some phones may arrange the list in another order.
Note: The system removes duplicate entries of the same call type from the same caller. For example, multiple calls from the same caller are reduced to one call.
The phone system can be operated and viewed via the touchscreen or instrument panel.
To access the phone features, a phone must be paired with the vehicle. Further information on pairing a phone can be found in the relevant section of the Owner's Handbook.
To access the phone screen, touch the phone icon on the home screen.
To access the phone screen in the instrument panel, press the O icon to display the instrument panel menu. Search Phone and press O icon. For further information, please refer to the relevant section of the Owner's Handbook.
The phone system can also be operated via voice commands. Further information on voice control can be found in the relevant section of the Owner's Handbook.
A phone can also be charged using a wireless charger. For further information, please refer to the relevant section of the Owner's Handbook.
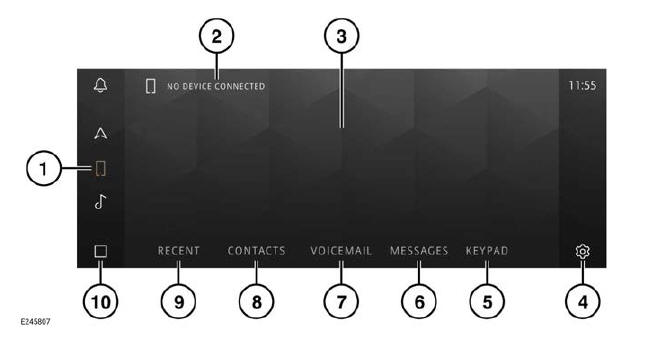
Touchscreen phone menu

- Phone icon: Touch to select the phone screen. When the phone screen is selected, the icon (1) becomes illuminated.
- Paired device: Displays the name of a paired device or a list of paired devices. Also contains a Bluetooth icon to allow pairing of a new device.
- Feature display: The selected feature is displayed in this area.
- Settings icon: Touch to access the phone settings screen.
- KEYPAD: Touch to access the keypad dialing mode.
- MESSAGES: Touch to display a list of
received messages.
Note: The availability and functionality of MESSAGES depends on the specification of the vehicle and the market in which the vehicle is being used.
Note: The availability of MESSAGES depends on the handset used and settings on the mobile device.
- VOICEMAIL: Touch to display voicemail options.
- CONTACTS: Touch to display the downloaded contacts.
- RECENT: Touch to display a list of recently dialed, received, and missed calls. Note: The touchscreen displays the recent call list in the order that the calls were recorded. If this information is not available on the paired phone, the recent call list displays as sent from the phone. Some phones may arrange the list in another order.
- Home icon: Touch to return to the home screen.
PHONE COMPATIBILITY
Please refer to the Land Rover website at: www.landrover.com for a list of compatible phones.
Note: The Bluetooth wireless technology devices listed have been tested for compatibility with Jaguar Land Rover vehicles. Performance varies, based on the phone's software version, battery condition, coverage, and the network provider. Phones are warranted by the phone manufacturer, not by the vehicle manufacturer.

